Cables, Connectors, and Screws (Oh My!) – the Challenges of Assembly Verification
There’s an old saying: “the devil is in the details.” When it comes to assembly verification in complex electromechanical devices such as smart phones, laptops, and keyboards, that saying couldn’t be more true. Even a tiny defect such as a loose connector or slightly misrouted cable can cause problems. A defective unit may not be caught until final assembly or functional test at the end of the production process, resulting in rework and wasted time or materials.
In the worst case, a defective unit could slip through functional test and be shipped to market. Jostling and vibration that occurs during shipment and device use may cause a loose connector to completely detach or a misrouted cable to be pinched, and—whoops! Now you have a latent failure on your hands, not to mention one unhappy customer!
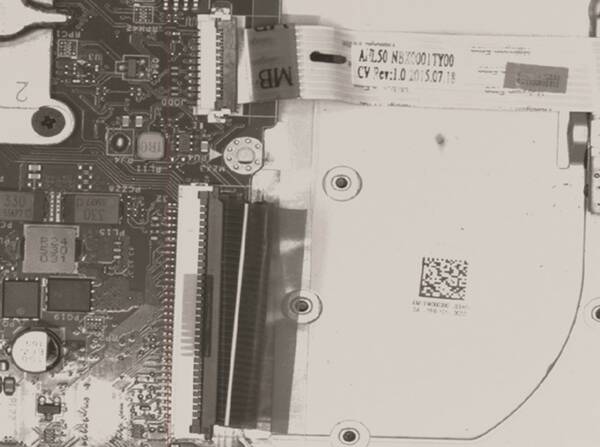
Loose connector—a latent failure waiting to happen.
Common Assembly Defects
Complex device assemblies comprise many small parts and low-contrast elements that are difficult for humans and machines alike to assess at production speeds. Some of the most common defects in electromechanical assembly include:
- Component issues: presence/absence, improperly installed, or wrong type
- Missing labels or labels that do not match device configuration
- Cabling issues: routing and connections
- Missing or damaged screws and fasteners
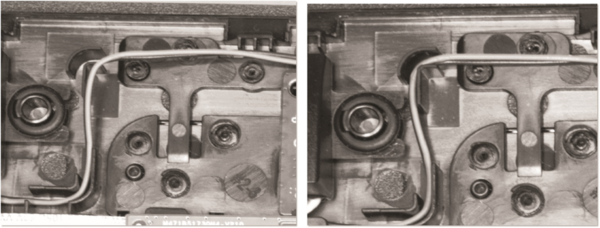
Misrouted cable (left) compared to cable that is properly threaded through the cable guide (right).
Subtle differences like these are easier for automated systems to detect. Photometry-based imaging systems provide benefits beyond standard machine vision for automated inspection, capturing more pixels and more gray levels in an image to evaluate contrasting points of interest that may indicate a defect.
The cost of a defect is much lower if detected on the line than as a latent failure that emerges only after a device is released to market. Costs at the manufacturing stage are limited to potential rework or materials waste. After a product is shipped, however, direct and indirect costs can rapidly escalate, including:
- Returns, repairs, and warranty claims
- Customer dissatisfaction and loss of customer loyalty
- Damage to brand reputation and perception of quality

Misaligned or poorly-printed logos diminish the quality perception of your brand.
Inspection Methods: Machine Vision & Human Inspectors
Machine vision systems are common in many assembly-line inspection applications. These systems provide the quantifiable data necessary to automate processes and offer the speed to meet production demands. However, many vision systems today are limited in their ability to detect defects in complex assemblies—especially low-contrast components or those with very fine spatial tolerances. On the other hand, human inspectors excel at identifying anomalies and subtle details. However, their inspection performance is slower and less consistent, limiting production efficiency and permitting costly escapes.
Standard machine vision systems lack the resolution and dynamic range necessary to detect all defects in very complex assemblies, especially unexpected or random defects, or those in low-contrast areas. Human inspectors have greater visual acuity to detect subtle defects, but they are subject to fatigue and inconsistency. They are also unable to capture meaningful quality data at production speeds.
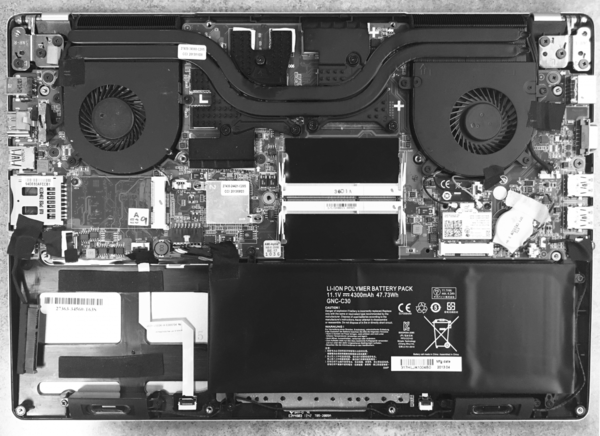
The complexity of today’s electromechanical device assemblies can quickly fatigue human inspectors, while defects in low-contrast areas can elude machine vision inspection capabilities.
Photometry-based Systems
Photometry-based assembly verification systems perform better than typical machine vision or human inspectors when it comes to catching subtle defects in complex electromechanical assemblies, ultimately helping decrease your rate of escapes and latent product failures.
Photometry-based systems provide the same automation benefits of speed, reliability, and data capture as machine vision solutions for device inspection. However, photometry-based cameras (so-called because they are engineered for photometric light measurement) typically use image sensors with higher resolution and dynamic range compared to standard machine vision cameras, making them better equipped to detect small and low-contrast defects. With their technical advantages for light measurement, photometry-based imagers capture extremely detailed images to allow fine-scale determination of light, color, and contrast variations.
The sensor resolution of a photometry-based imager may offer 29 megapixels or more, providing sharpness and detail equivalent to the human eye for inspection applications. The resolution of a standard machine vision camera sensor, on the other hand, typically ranges from one to five megapixels. Machine vision systems are commonly used to increase speed when distinguishing relatively obvious visual differences, and there is usually little need for very fine-scale resolution when used for high-throughput applications. In assembly application where product quality takes priority over production speed—either because the product is too valuable, or too high-risk to consumer welfare or a brand’s reputation—a photometry-based system can offer an in-line inspection solution that takes a quality-over-quantity approach to ensuring assembly to absolute specifications.
Another critical attribute of photometry-based imagers is dynamic range; that is: the number of grayscale values that can be discerned in an image. An image sensor with a broader dynamic range enables the photometry-based camera to detect subtle variations on surfaces caused by shadows or reflections of light (e.g., shadows that indicate an improperly-seated screw, or spectral reflections that indicate a metal component on a metal surface). The broad dynamic range of photometry-based systems make them a close to match human visual perception of contrast variations.
This capability, coupled with their high resolution, enables photometry-based vision systems to capture and classify small and low-contrast defects with extreme precision. The imaging advantages that ensure low image noise (like those provided by Radiant’s ProMetric® Imaging Photometers and Colorimeters), also help to maintain processing speed—the clearer the captured image, the faster the system can analyze the most discernable details.
In some cases, a photometry-based imaging system can detect defects so subtle that they go unnoticed by human inspectors. These might include light scratches on glass, hairline gap variations between keys in a keyboard, or the absence of tiny black screws from a black surface.
Because photometry-based systems capture and analyze an entire image at one time, they excel at identifying random or unexpected defects. This is most important for cosmetic surface inspection, where anomalies like dents, debris, fingerprints, and other defects may occur at unknown locations. Leveraging capabilities used to identify non-uniform areas in illuminated displays, photometry-based systems can detect and grade randomly-occurring areas of inconsistent contrast, categorizing these by defect type and passing or failing them based on type, location, or severity.
Where’s the Screw?
A missing screw presents more than one possible problem. It could mean a component is not firmly attached and could come loose in the future, or simply that components are not fixed together with the necessary pressure to maintain contact between leads, power sources, or buttons. A missing screw also begs the question: where did the screw go? Is it on the assembly room floor, or did it fall out along the line? Or, worse, is it still loose inside the device where it may end up sealed inside the housing to damage other delicate interior components during transport?
Standard machine vision systems typically have trouble capturing low-contrast components such as a black screw on a black surface, and so will not reliably detect when there is an issue. The broad dynamic range of the photometry-based systems, however, makes them capable of detecting very low-contrast features such as screws or other components that match the visual qualities of the surrounding surface color or texture.

The presence or absence of black screws on a black surface (left). Machine vision systems can’t detect the difference between a black screw and the empty screw hole (center), which could allow parts to come loose and cause failure during shipment or consumer use. A photometry-based system detects the missing screw (right) and fails the device, so that the defect can be repaired before shipment.
These are just a few examples of the precision that photometry-based vision systems offer for assembly verification, surface inspection, and other automated visual inspection applications. Like machine vision cameras, photometry-based systems can be applied at any point in the manufacturing process for precision inspection beyond machine vision capabilities. Photometry-based cameras can also be integrated into fixtures and automation equipment to solve unique inspection applications.
With a 29-megapixel photometry-based imaging system at its core, Radiant’s INSPECT.assembly™ is a turnkey, automated inspection station specially designed for in-line assembly verification of complex, board-based assemblies. This system is fully configurable, and rolls onto any production line to perform sophisticated pass/fail analyses for fast, accurate defect detection, achieving the acuity of human vision at automated production speeds.
To learn more about the benefits of photometry-based systems, read Radiant’s Tech Note: “Cables, Connectors, and Screws (Oh My!): Improve Detection of Common Assembly Defects to Reduce Latent Failures.”
Join Mailing List
Stay up to date on our latest products, blog content, and events.
Join our Mailing List
