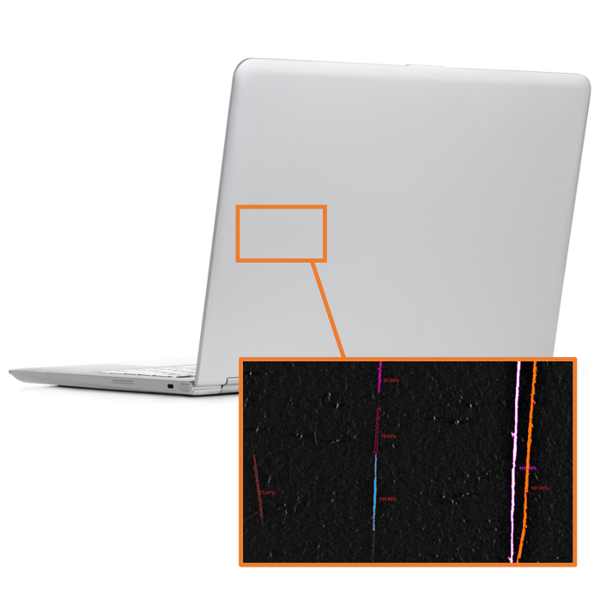
Customers of today’s consumer electronics devices expect a flawless product out of the box. Scratched, dented, smudged, and otherwise imperfect products result in costly returns and may damage your brand’s reputation and future business. Quality control activities to prevent and detect surface defects rely largely on human inspectors. Humans can apply their acute visual perception and immediate judgment during production to ensure defective products are not shipped to consumers. However, the faster the production rate, more complex the product, or more obscure the defect, the more difficult it is for humans to keep up with throughput demands while adhering to the need for absolute quality.
Radiant ProMetric® Imaging Photometers are engineered to measure and detect subtle variations in light uniformity across illuminated components. Our solutions combine the speed and consistency of automation with the discernment of human vision. Using advanced photometric measurement capabilities, Radiant imagers are ideally suited for detecting anomalous features on surfaces and grading these defects based on their location, scope, and severity. You will experience all of the benefits of automated cosmetic inspection, including objective analysis and quantifiable results, and get the data you need for error tracking to improve production and operations. An extensive set of machine vision and photometric evaluation tools are also available for production-level monitoring and pass/fail test sequencing using Radiant’s TrueTest™ Automated Visual Inspection Software.
Scratches, Dings, and Dents
The Advantage of Photometry-Based Imaging
The performance of a machine vision inspection system depends on the quality of images it can acquire. High-quality images enable the system to “see” defects in greater detail and apply meaningful evaluations. The resolution of a standard machine vision camera sensor typically ranges from one to five megapixels. Radiant solutions leverage the superior resolution and dynamic range of our ProMetric Imaging Photometers.
Unmatched Camera Resolution and Dynamic Range
Our Advanced Vision systems capture unmatched image clarity. Their high dynamic range can detect hairline variations on part surfaces caused by reflections of light (like shadows that indicate a scratch), while high resolution image sensors can image and classify defects with extreme precision. Radiant cameras detect defects unnoticed by human inspectors, including light scratches on glass and foreign particles.
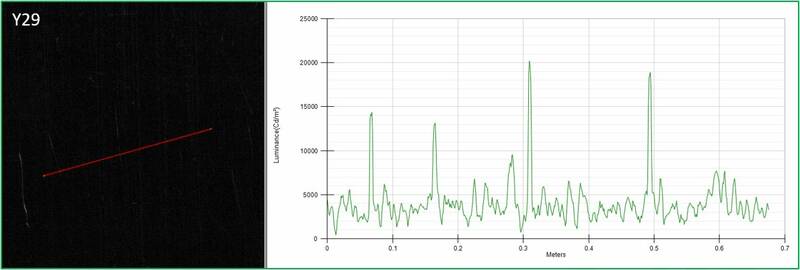
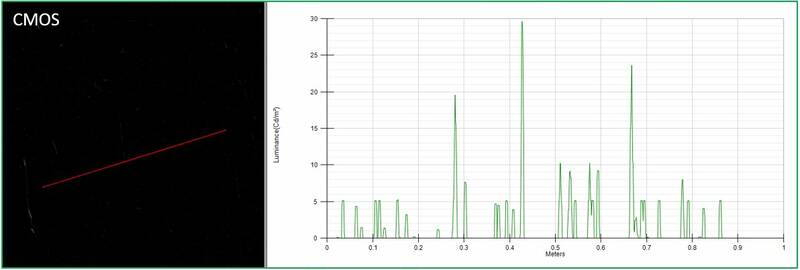
A Radiant imaging solution offers superior dynamic range for surface inspection, even when compared to higher-resolution systems. In the examples below, two cameras are used to image a scratched aluminum surface (dark images on left), and contrast differences are analyzed to identify surface scratches (graphs below).
The first image was captured using a Radiant ProMetric Y29 (29-megapixel) imaging system. The corresponding graph shows four large peaks where four scratches are identified. The bottom image was captured using a third-party 71-megapixel CMOS vision system. Even to the human eye, this image exhibits fewer contrast differences. In the corresponding graph, only three large peaks are registered, indicating that the 71MP sensor does not have sufficient dynamic range to identify the first scratch (indicated by the left-most of the four peaks in the Radiant analysis graph).
Comparison of Radiant versus Other Imaging Solutions
Radiant ProMetric® Y29 (29-megapixel imaging system)
Third-party 71-megapixel imaging system
Unknown Defects in Unknown Locations
Radiant offers complete camera systems that use advanced imaging technology and sophisticated algorithms to locate and characterize randomly-occurring cosmetic defects on device surfaces, including unknown defects in unknown or unpredictable locations on a part. By taking a wide area image of a device, our systems can perform uniformity checks to detect hairline scratches, subtle dents, or even fingerprints on device surfaces. The systems can classify the severity of each defect against acceptable tolerances and apply pass/fail values, just as a human would use their judgment to determine a reasonable margin of error.
Unlike human inspectors, however, Radiant solutions can apply numeric values to each defect and quantify these by size, shape, location, frequency, and rate of occurrence, building trend analysis data that allow you to fine-tune processes, improve product quality, and increase production efficiency. Built on the Radiant TrueTest Software platform, these systems can simultaneously perform other inspections, including part orientation, assembly verification, fit and finish analysis, and label legibility, eliminating the need for a separate machine vision system on the line.
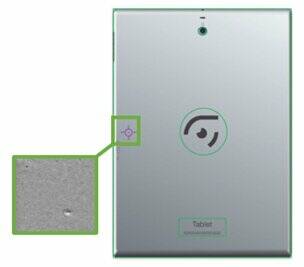
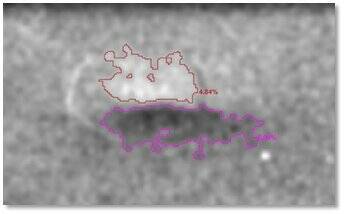
Dent detected on tablet back.
A dent’s length and width can be measured to determine whether a device passes or fails.
Marked Character Inspection
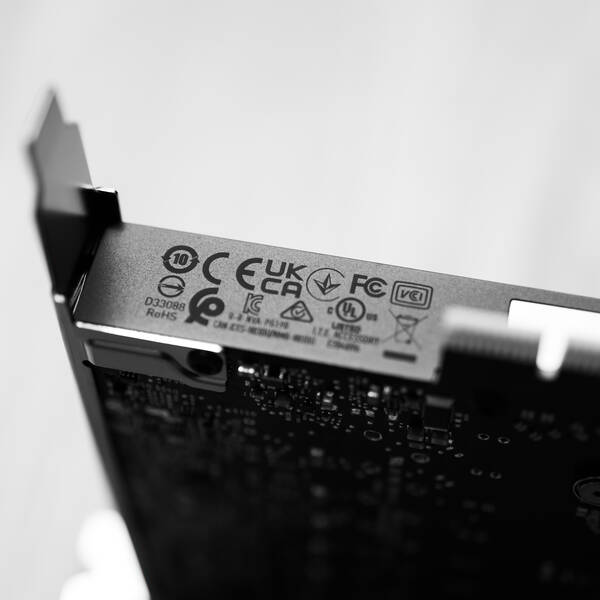
For many electronics products sold today, markings such as text, characters, and symbols are applied to component surfaces via printing, laser, or other methods. Some markings are necessary to provide user instructions or information for device control and operations. Some are used by the manufacturer for quality and tracking purposes (e.g., serial numbers or lot numbers), and other marks may be for branding, such as logos. Many types of products are also governed by various regulations that require specific information to be displayed on the product, for example, the CE mark in the EU or a RoHS hazardous materials safety mark.
Markings can include a wide range of both standard and custom characters (letters and numbers), symbols, shapes, or patterns. They may be etched onto surfaces such as metal or plastic, or imprinted in black/white or color. Many are quite small, with a single stroke width measuring only a few microns wide. Manufacturers need automated, precise methods to inspect and verify the quality and correctness of markings before products are shipped to market.
Radiant's Area Color Inspection System (ACIS™) solution enables users to perform fast, automated measurement of text and symbol shape (inclusions and exclusions), dimensions, color, and contrast.
Area Color Inspection System (ACIS™)
The Area Color Inspection System (ACIS™) is an integrated solution for efficient inspection of characters and color on surfaces such as metal or plastic. Users can quickly measure markings such as patterns, text, symbols, and color with precision at production speeds. A ProMetric® I-series Imaging Colorimeter and lens are mounted to an innovative LED-based dome illumination configuration within a metal assembly frame. The unit can be used in a lab or on a production line to capture high-resolution images of DUTs. Completing the solution is ACIS software, which combines high-resolution imaging colorimetry capabilities with sophisticated image analysis for precision quality and color measurement.
ACIS Key Capabilities
With ACIS, manufacturers can:
- Measure multiple locations simultaneously across an area to inspect color consistency between points
- Inspect small elements thanks to high-resolution, high-sensitivity measurement capabilities with resolution as small as 10 μm per pixel
- Take precise chromaticity measurements (L*a*b*) of small areas that are difficult to measure with conventional systems
Verify Markings for Regulatory Compliance
Electronics and other products must meet multiple standards in today’s complex global marketplace. Various markings are required to indicate compliance or provide crucial information to users. For example:
- Many products sold in the European Union require a CE mark, indicating that they have been assessed and meet specific requirements for safety, health, and environmental protection
- Any electrical or digital products sold in the United States with communication/transmission capabilities (such as Bluetooth or Wi-Fi) are required to display an FCC certification ID number
- Restriction of Hazardous Substances (RoHS) Directives are designed to ensure that any electrical and electronic equipment does not include specific materials that are deemed hazardous to human health or the environment
- A variety of national and international standards require markings related to battery and power specifications and safety, such as those of the International Electrotechnical Commission (IEC)
Typically, these standards not only require specific markings to be displayed on products, but also that the markings remain for the lifetime of the product, meaning they cannot be easily removed or smudged, they are resistant to solvents, and similar criteria. This requirement leads many manufacturers to opt for permanent marking methods such as laser etching.
